

Place the panel at the short end of your yoga mat, centered behind your head or feet, with the LEDs aimed along your body. Start 6–12 inches from the nearest exposed skin, angle the panel toward your torso, and reverse your position when one panel cannot illuminate you evenly from shoulders to ankles.
Does your upper body glow brightly while your hips and legs remain in shadow during floor poses? A centered, carefully angled setup provides more repeatable coverage without requiring you to drag the panel around the room. Position your mat, panel, and body to favor comfort and consistency rather than maximum intensity.
What Full-Body Coverage Means

A home panel does not need to illuminate every inch of skin at exactly the same intensity to provide broad-area exposure. In this context, full-body coverage means keeping the main areas you want to expose—typically the back, shoulders, hips, thighs, and lower legs—within the panel’s light field for most of the session.
Red light therapy, also called photobiomodulation, uses visible red and invisible near-infrared wavelengths rather than ultraviolet light. Visible red light is generally associated with superficial tissue, while near-infrared light is used when deeper structures, such as muscles and joints, are the focus. The biological effects depend heavily on wavelength, device strength, exposure time, frequency, and distance, so positioning is part of dosing—not merely a matter of convenience.
A yoga mat is usually about 6 ft long, while many home panels are considerably shorter. Unless you own a tall panel or multipanel array, one stationary panel may not cover your entire body uniformly. The practical solution is to prioritize the torso and hips, use poses that bring your limbs into the light field, and reverse your orientation partway through the session when necessary.
Find the Best Starting Position

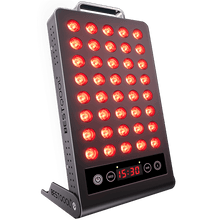
Place the panel on a stable floor stand at the short end of the mat. Center it on the mat’s long centerline rather than aligning it with one shoulder or hip. When you lie down, the middle of the LED area should point toward the center of the body region you most want to expose.
For a general recovery session, position the panel behind your head and angle it slightly downward toward your chest, abdomen, and thighs. If lower-body recovery is the priority, place it behind your feet and angle it upward toward your calves, knees, and hips. With a midsize panel, aiming toward the hips often provides the best compromise because the light can spread toward both the torso and upper legs.
To check the alignment, lie in your main resting pose and examine the light pattern across your clothing or skin. Both sides of your body should appear similarly illuminated. If one shoulder is bright and the other is dim, the panel is probably off-center or rotated. Adjust the stand rather than twisting your body to compensate.
Choose the Distance Before Moving

Many panels are used approximately 6–12 inches from the skin, but the correct distance is the range specified for your model. Recommendations vary because devices differ substantially in output, LED lenses, and beam angle.
Increasing the distance usually enlarges the illuminated area but reduces the amount of light reaching the skin. Moving closer increases intensity but may create a narrower field, uneven hot spots, and more warmth. The balance between distance and session duration matters because photobiomodulation appears to have a biphasic response: too little exposure may have minimal effect, while more exposure is not automatically better.
For example, your shoulders may be well illuminated at 6 inches while your hips remain outside the bright central field. Moving the panel back to 10 inches may distribute the light more evenly across both areas, although the delivered intensity will be lower. After changing the distance, do not automatically keep the same session length; follow the device instructions for the new position.
If you are new to the panel, treating a sensitive area, or combining exposure with slow yoga movements, begin at the farther end of the recommended range. You should remain comfortable and feel no more than subtle warmth. Move farther away or shorten the session if your skin becomes distinctly hot, uncomfortable, or irritated.
Keep the Panel Stable and Clear
The panel must remain stable while you transition between poses. Place a freestanding unit on a level surface beyond the edge of the mat, not on the mat itself. Soft foam can make a stand wobble, and a loose power cord beside the mat can create a tripping or entanglement hazard.
Leave enough open space for your hands, feet, and head to move without striking the housing. A 6-inch treatment distance does not necessarily mean the stand should be only 6 inches from the mat; measure from the LED surface to your skin while you are in the pose. If your feet extend beyond the mat during a stretch, provide additional clearance.
Panels also need airflow. Do not press the back or ventilation openings against bedding, curtains, cushions, or a wall unless the mounting instructions specifically allow it. An open door or small room fan may improve comfort during longer sessions, but avoid directing airflow into your eyes while you relax.
Route the cord away from the side you use to enter and exit the mat. You should be able to stand naturally without stepping over the cord or reaching behind an illuminated panel to turn it off.
Match the Angle to Your Floor Poses
Supine Poses
For poses performed on your back, such as constructive rest, reclined butterfly, or knees-to-chest, place the panel behind your feet when your legs are the main target. The light will travel toward your soles, calves, thighs, and hips, although bent knees will create shadows.
If your shoulders, chest, or abdomen are the priority, place the panel behind your head. Keep your head far enough from the panel for the brightness and heat to remain comfortable. When your face is within the direct beam, follow the panel’s eye-protection instructions rather than assuming closed eyelids are sufficient. Clinical guidance notes that unprotected eyes may be harmed by incorrect or excessive use, even though red light therapy does not use ultraviolet radiation.
To reduce shadows in reclined butterfly, move your feet slightly farther from your pelvis so your raised knees do not completely block the inner thighs. During knees-to-chest, expect the front of your thighs to receive more direct light than your lower legs. Use a second position if calf coverage is important.
Prone Poses
For poses on your stomach, position the panel behind your feet to emphasize your calves, hamstrings, and the backs of your thighs. A gentle prone rest with your legs extended creates a relatively clear path along the mat.
To favor your upper back and shoulders, reverse direction and move your head closer to the panel. Use a folded towel or low yoga prop to keep your face neutral without forcing your neck to rotate. Avoid covering the treatment area with thick blankets when the device instructions call for direct exposure to clean, bare skin.
A low sphinx pose illuminates the upper back differently from a fully prone position because lifting your chest changes both the distance and angle. Treat that movement as a meaningful change in exposure, especially when using a powerful panel.
Side-Lying Poses
Side-lying positions are useful when one panel cannot reach both sides of your hips and legs evenly. Lie perpendicular or slightly diagonal to the beam so your outer shoulder, waist, hip, and thigh face the LEDs. Turn to the other side halfway through the session.
Two short, evenly timed side-lying exposures are more repeatable than spending an entire session with one hip directly illuminated and the other concealed. Mark your position on the mat with removable tape to maintain a similar distance after turning.
Seated Forward Folds and Child’s Pose
For seated forward folds, a panel behind you can illuminate your back, hips, and hamstrings, but your torso angle may bring certain areas much closer to the LEDs. Begin with more clearance than you would use while lying flat. Check the closest point—often your lower back or hips—rather than measuring from the edge of the mat.
In child’s pose, a panel behind your feet directs light toward your soles and the backs of your legs, but the folded position creates substantial shadows around your abdomen and the fronts of your thighs. A panel behind your head can favor your upper back if the beam is angled downward. Child’s pose is therefore better for targeted exposure than for uniform full-body coverage.
Improve Coverage With One Panel
The easiest way to improve coverage is to divide the session by body orientation rather than extending it indefinitely. Spend one portion with your head toward the panel and another with your feet toward it. You can also alternate among supine, prone, and side-lying positions to expose surfaces that would otherwise remain shaded.
For a 12-minute session, you might spend the first six minutes with the panel aimed from your feet toward your lower body, then turn around for six minutes of upper-body exposure. This approach does not guarantee a particular therapeutic dose because actual irradiance is device-specific, but it creates a more balanced routine than illuminating the nearest area for the full 12 minutes while the farthest area receives only weak, scattered light.
Use shorter introductory sessions when experimenting with new poses or distances. Home-use recommendations often begin at 5–10 minutes and increase only when supported by the device instructions and your individual response. The optimal dose remains uncertain across different goals, and consumer devices vary considerably in strength. Consistent positioning is therefore more practical than pursuing the longest possible exposure.
If repositioning disrupts your relaxation, mark two repeatable panel locations on the floor: one for upper-body poses and one for lower-body poses. This simple adjustment can make a one-panel routine easier to maintain.
Avoid Common Positioning Mistakes
Placing the Panel Too Close for Movement
A distance that works while you are lying still may become unsafe when you lift your legs, enter bridge pose, or reach your arms overhead. Test your full range of motion with the panel turned off. Your closest body part should remain within the approved distance, and you should not be able to kick or strike the device accidentally.
Measuring From the Mat Instead of the Skin
Measure from the LEDs to the illuminated skin, not from the stand to the mat. In bridge pose, for example, your hips may move several inches closer to a panel positioned behind your feet. During a forward fold, your back may approach the panel even though the mat has not moved.
Assuming Brighter Means Better
Brightness does not reveal the precise dose reaching your tissue. Irradiance specifications can also be difficult to compare when testing methods and measurement distances differ. A panel advertised as having high output is not necessarily appropriate for use at its closest possible position.
Serious side effects appear uncommon when equipment is used properly, but red light therapy should not become a contest to tolerate more heat or brightness. Discomfort is a reason to reduce exposure, not evidence that the session is effective.
Trying to Cover the Entire Body Without Turning
Your arms, bent knees, yoga blocks, and torso can all create shadows. Even a tall panel may not expose the sides of your body evenly from one direction. Changing position is usually more practical than moving closer in an attempt to force more light into shaded areas.
Moving Near an Unstable Stand
Balance transitions, flowing poses, and large leg movements increase the chance of hitting the equipment. Floor-based red light sessions are better suited to slow, controlled mobility, restorative positions, and intentional holds than to fast yoga flows beside a heavy electrical panel.
Pros and Cons of a Behind-the-Mat Setup
Advantages |
Limitations |
Keeps the panel outside the main mat area |
One panel may not illuminate a 6-ft body uniformly |
Supports supine, prone, seated, and side-lying positions |
Bent joints and props create shadows |
Makes distance easier to reproduce |
Movement changes the skin-to-panel distance |
Can combine gentle mobility with light exposure |
Direct facial exposure may require eye protection |
Requires less room than a full-body booth or array |
Reversing direction may be necessary for balanced coverage |
The main advantage is repeatability. Once you mark the positions of the panel, stand, and mat, you can recreate the same geometry without guessing during every session. The main limitation is uneven exposure: panels provide directional light, while the body has curves, sides, and overlapping limbs.
Complete a Pre-Session Check
Before turning on the panel, confirm that the stand is stable, the ventilation openings are clear, the cord is out of your path, and your planned movements cannot bring you too close to the LEDs. Set the timer before settling onto the mat, uncover the areas you intend to expose, and use the eye protection specified in the device instructions.
If you take photosensitizing medication, have a light-sensitive condition or a history of eye disease, or plan to expose a suspicious skin lesion or significant wound, ask a qualified healthcare professional whether home red light use is appropriate. Red light therapy is a wellness tool and possible adjunct, not a substitute for diagnosis, rehabilitation, or established medical care.
Create a Repeatable Setup
For most floor-based routines, center a stable panel behind the short end of the mat, aim it toward your hips or torso, and begin 6–12 inches from the nearest exposed skin unless the device instructions specify otherwise. Use slow poses, monitor changes in distance as you move, and reverse your orientation when the far end of your body remains dim.
The best setup is not the brightest or most complicated one. It is the arrangement you can reproduce comfortably, safely, and consistently without guessing at the distance or forcing your body to fit the equipment.


 Small
Small

 Moderate

 Moderate

 Moderate

 Full
Full

