
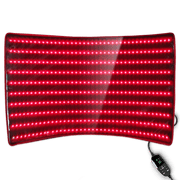
For red light therapy on a specific joint, use the conservative session time documented for your exact device, target area, distance, and coverage. There is no evidence-supported universal number of minutes that applies to every knee, elbow, panel, wrap, or handheld device. If the instructions do not provide a joint-specific setting, do not guess based on the device's wattage, LED count, wavelength, or irradiance. Get product guidance that matches the setup or seek professional input instead.

Start With the Device's Documented Session Time
The most useful starting point is the device's own documented time or range for the intended treatment area. Before you begin, identify the recommended distance, output or irradiance, coverage area, timer setting, and frequency. These details work together, so a time copied from another device is not a dependable substitute.
Research protocols vary by condition, device, wavelength, irradiance, treatment area, and schedule. That is why a single knee or elbow session time should not be treated as universal in musculoskeletal photobiomodulation research. FDA guidance for PBM device submissions also does not establish a home-use timer for every product. Use the product's labeling and instructions for timing, distance, and intended use rather than treating regulatory guidance as a treatment prescription.

If the manual provides a conservative starting range, use the lower end documented for your target area and keep the first routine consistent. A session that produces no immediate change is not automatically too short. Red light therapy may be used as a wellness routine for comfort or stiffness, but it should not be presented as treatment for an undiagnosed joint problem or as a guaranteed source of pain relief.
Adjust Red Light Therapy on a Specific Joint for Output and Coverage
Joint size affects how much area must be covered, but the word "knee" or "elbow" does not determine the timer. Use the selector below to decide whether the documented time applies directly or whether the setup requires different documented instructions.
| Situation | Measurable setup difference | Session-time action |
|---|---|---|
| The manual names the joint or target area | The device specifies time, distance, coverage, and frequency for that use | Follow that documented setting. Do not add time after one session simply because the response is not immediate. |
| A knee needs broader coverage than an elbow | The target area cannot be covered in the stated position | Reposition only as the instructions allow. Use the stated total exposure or position-by-position limit rather than extending the session on your own. |
| The device has a different documented output or measurement distance | Irradiance is reported at a different distance, or the device format changes from wrap to panel or handheld | Keep the device's own time and distance together. Do not transfer minutes between formats or convert output into a timer yourself. |
| The intended area is not the joint | The instructions name another area, such as the face or hands, or do not mention joint use | Do not assume the listed routine applies to a knee or elbow. Obtain guidance that matches the target area before using a new time. |
Knee research can describe condition-specific protocols, but it does not prescribe a home session length for every consumer device or for elbow use. A review of knee osteoarthritis PBM research is therefore useful for understanding that distinction, not for converting a study protocol into a personal timer.
The same principle applies to specifications. A wrap listed at 59.8 mW/cm² at its surface and a portable device listed at 70 mW/cm² at 3 inches are measured under different product conditions and intended-area instructions. Those figures show why output alone cannot establish a knee or elbow session time. They are not a basis for calculating one.
Set Distance and Aim the Light at the Whole Joint
Position the device exactly as its instructions describe before judging whether the chosen session length is appropriate. A consistent setup makes the routine easier to assess and prevents moving the device closer or adding exposure from becoming an accidental adjustment.
- Confirm the documented distance. Measure or use the positioning aid specified by the manufacturer. Keep that distance consistent during the initial trial rather than moving the device closer to increase intensity.
- Align the intended target. Aim at the joint area named in the instructions and keep the angle and coverage as consistent as practical. A knee may need different placement than an elbow because its shape and area differ, not because one joint has a universally longer timer.
- Handle repositioning only as directed. If one position cannot cover the target, follow the device's instructions for additional positions and total exposure. Do not automatically double the session. Follow any eye-protection, eye-avoidance, or direct-eye-exposure directions supplied for that device. Eye instructions vary by device and intended use, so do not infer them from a wavelength label alone.
This procedure matters when evaluating red light therapy for knee pain or an elbow routine because poor alignment can make a documented session appear ineffective. Fix the documented distance and coverage first. Changing the number of minutes is not a substitute for covering the intended area.
Repeat the Same Routine Before You Reassess It
Follow the device's stated frequency and keep the first trial controlled. Record the target joint, session time, distance, coverage, and one observable goal, such as comfort during a normal activity or ease of movement. Changing several variables at once makes it difficult to tell whether the routine, positioning, or device fit affected the result.
Do not adopt a universal schedule for every device or condition. Clinical research has examined photobiomodulation alongside rehabilitation within specific protocols, but that does not establish that longer or more frequent unsupervised home sessions are better. Condition-specific rehabilitation research supports keeping those studied protocols separate from general home-use timing. Repeat the documented routine consistently, then reassess the defined goal after a properly followed trial rather than after one disappointing use.
For related scheduling questions, you can review guidance on knee session frequency or time between sessions. Use these as informational follow-up, not as a replacement for the exact frequency stated for your device and intended treatment area.
An ongoing stiffness routine and a new or worsening flare are not the same situation. If the joint problem is changing, interfering with normal function, or not improving as expected, professional guidance is more useful than repeatedly increasing exposure.
Stop Adjusting When Your Response or Symptoms Raise a Concern
Use these actions when a session seems ineffective, uncomfortable, or unsuitable for self-directed use:
- Verify the setup first. Recheck the timer, documented distance, alignment, target coverage, and consistency before deciding that the session needs more minutes.
- Pause for an unusual reaction. Stop using the device if it causes unusual warmth, redness, irritation, eye discomfort, or worsening symptoms, then follow the device's safety directions.
- Reject automatic escalation. No immediate response does not prove underexposure, and a longer session does not correct incomplete coverage or an unsuitable distance.
- Get professional guidance when the situation is not routine. Severe, unexplained, worsening, or function-limiting symptoms deserve evaluation rather than continued self-adjustment. Relevant safety factors that could change whether light-device use is appropriate also warrant individualized advice.
Follow the device's eye-safety directions whenever they apply. The American Academy of Dermatology's red-light safety guidance supports treating eye instructions as device-specific rather than assuming every red-light product has the same requirement.
The practical next step is simple: find the exact manual, use its conservative documented time at its documented distance, keep coverage and frequency consistent, and reassess without escalating after one use. That is the most defensible approach to red light therapy on a specific joint when no universal knee-or-elbow minute count exists.
FAQs
These questions cover how to choose a documented session time, account for coverage, repeat the routine, and respond to an unusual reaction.
What is the shortest practical starting time for red light therapy on a knee or elbow?
There is no evidence-supported shortest time that applies to every device. Use the conservative starting time or range documented for the exact output, distance, coverage, and target area. If those details are missing, do not choose a number by guessing from the joint name or a device specification.
Does red light therapy take longer on a knee than on an elbow?
Not automatically. A knee may require broader coverage or more than one position, while an elbow may fit within a more compact treatment area. The device's documented time, distance, coverage, and repositioning instructions control the routine, not the joint label alone.
How often should I use red light therapy on one joint before reassessing it?
Follow the frequency stated for your device and keep the setup consistent while tracking one defined goal. There is no universal interval for every condition and device, so avoid adding sessions after one disappointing use. Reassess after a properly followed trial, and seek guidance if symptoms worsen or limit function.
What should I do if red light therapy makes my joint area feel irritated or unusually warm?
Pause the routine and review the documented distance, timer, and positioning. Follow the device's safety instructions. If irritation, unusual warmth, eye discomfort, or worsening symptoms persist or concern you, seek professional guidance instead of increasing the session time.


