

Mount the panel securely, maintain a clear pathway, and use the manufacturer’s instructions to set treatment distance. Adjustable positioning, controlled brightness, ventilation, eye protection, and consistent distance markers can make a compact treatment room safer and more comfortable.
A treatment room may seem comfortable until the client sits down with bright LEDs inches from the face, nowhere to place personal belongings, and a power cord near the feet. Thoughtful panel positioning can provide consistent coverage while reducing glare, heat discomfort, awkward movement, and tripping hazards. The following approach can turn a limited space into a calm, practical treatment area without compromising basic safety.
Start With the Treatment Goal, Not the Empty Wall
Before mounting a panel, determine whether most sessions will target one body region or provide broader exposure. A compact panel used for the knees, shoulders, or face requires a different position from a tall panel intended to cover most of a standing client.
Panel size should match the intended treatment area, because larger panels provide broader coverage while smaller devices are easier to aim at individual joints or skin areas. Installing the largest available panel in a small room can reduce walking space, create excessive brightness, limit posture options, and make it difficult to maintain the manufacturer’s recommended distance.
The most practical small-room setups are built around one primary client position. For example, if most clients receive back and shoulder sessions while seated, center the panel behind a stable chair rather than mounting it at standing torso height and requiring every client to adjust. If the room supports several treatment goals, use an adjustable stand or mounting track instead of repeatedly moving furniture.
Choose a Primary Treatment Posture
Standing requires little furniture and can work well with tall vertical panels. However, it may not suit clients with pain, balance concerns, post-exercise fatigue, or limited mobility.
Seated treatment is often more comfortable and predictable. A firm, armless chair allows exposure to the front, back, shoulders, knees, or legs while giving the client a stable reference point. However, the chair takes up floor space and may block lower-panel coverage unless its height and design are selected carefully.
A treatment table supports relaxed, targeted sessions but requires more clearance around the client. In a very small room, placing a table beside a freestanding panel may leave too little space for staff to reach and adjust the controls safely. If reclining treatment is not central to the service, a supportive chair is often the more flexible choice.
Establish the Correct Panel-to-Client Distance
No single distance is appropriate for every red light therapy panel. Output, beam angle, treatment goal, exposed area, wavelength combination, and session duration all affect how much light reaches the client.
Common treatment distances range from approximately 6 to 24 inches, but the device manufacturer’s instructions should remain the primary reference. Moving a high-output panel closer because the room is narrow can increase intensity and discomfort. Moving it farther away may improve coverage but reduce the power reaching the skin.
Many panel instructions place clients about 6 to 12 inches away for targeted muscle or joint exposure. Facial or broader superficial treatments may use a greater distance when permitted by the device. These are planning ranges, not substitutes for the panel’s tested protocol.
Consider a room that is 6 ft wide. A panel and stand may occupy about 1 ft, while a seated client and chair may require approximately 2.5 ft. A 12-inch treatment gap adds another foot, leaving about 1.5 ft for access and adjustments. The setup may technically fit, but only if the door, cords, controls, and staff pathway do not compete for that remaining space.
Create a Repeatable Distance Marker
Do not rely on clients to estimate distance. Place a discreet floor marker where the chair’s front legs, the client’s heels, or the treatment-table base should align. A removable floor strip, washable positioning mat, or fixed furniture stop can make each session more consistent.
For seated treatment, measure from the panel face to the body region being exposed rather than to the chair. One client’s upper back may sit several inches in front of the chair legs, while another client may lean against the backrest. A support cushion can improve comfort, but it also changes the treatment distance and must be included when measuring the setup.
For standing sessions, mark both the client’s foot position and the direction the client should face. These markers reduce the likelihood that a client will step closer during treatment or rotate at a steep angle.
Aim for Even, Straight-On Coverage
Whenever practical, the panel should directly face the intended treatment area. A severe side angle can produce uneven coverage because one part of the body is closer to the LEDs while another is farther away.
Align the center of the panel with the main target area. For a seated lower-body session, lower the panel toward the knees instead of leaving it centered on the chest. For upper-back exposure, raise it so the active light area covers the shoulders and upper back without directing most of the output above the client’s head.
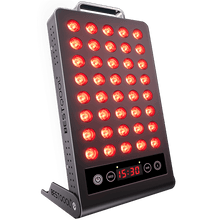
Vertical positioning works well for standing or seated full-torso sessions. Horizontal positioning may be more useful for the shoulders, lower back, or both knees. An adjustable stand offers flexibility, although its legs and wheels can create hazards in a tight room. A wall mount preserves floor space but provides less flexibility unless it includes height and angle adjustments.
Positioning Option |
Main Advantage |
Small-Room Limitation |
Wall-mounted |
Preserves floor space and reduces tipping risk when installed correctly |
May limit height, angle, or treatment posture |
Freestanding |
Easy to reposition for different body areas |
Stand legs and wheels require clear floor space |
Tabletop |
Practical for the face, hands, or individual joints |
Requires a stable surface and provides limited coverage |
Door-mounted |
Uses otherwise unused vertical space |
Door movement, hardware limitations, and cable routing require careful planning |
Protect the Client’s Eyes and Manage Brightness
Red light therapy does not use ultraviolet radiation, but powerful LEDs can still cause visual discomfort. Near-infrared output may also be active even when some LEDs do not appear bright.
Protective goggles and careful adherence to device instructions, particularly when the client faces the panel, receives close-range treatment, or uses a high-output device. Eye protection should be readily available, cleaned between clients, and inspected regularly for scratches or damage.
Do not position a facial panel where the client must look directly into it while entering the room, sitting down, or speaking with staff. Keep the panel switched off while positioning the client. Once the client is settled, confirm the treatment area, distance, timer, and eye protection before activating the LEDs.
Dim ambient lighting can make the room feel calmer, but it should not be so dark that clients cannot see chair legs, cords, steps, or personal belongings. Soft, indirect lighting is usually more practical than complete darkness. Avoid placing mirrors directly opposite the panel because reflected light can increase glare and make the space feel more intense.
Preserve a Clear, Safe Pathway
A small treatment room must still allow the client to enter, turn, sit, and leave without stepping over equipment. The safest panel location is not necessarily beside the most open-looking wall. It is the location that keeps treatment equipment outside the natural walking path.
Place the device near a suitable outlet to minimize the need for extension cords, which can create tripping hazards. Route the power cable behind the panel or along the wall rather than across the client area. If cable protection is necessary, use a purpose-designed cord cover instead of a loose rug.
Allow enough room for staff to reach the controls without leaning across the client or touching the panel’s exhaust area. The door should open fully without striking the panel, stand, chair, or treatment table. If the panel is freestanding, lock its wheels before every session and verify that the floor is level.
Before treating a client, rehearse the complete appointment with the panel switched off. Enter while carrying a bag, close the door, set down the bag, sit in the client position, adjust the panel, and exit. Any cord, stand leg, sharp corner, or narrow turn that feels inconvenient during this rehearsal may be more difficult for a client with sore joints or restricted movement.
Plan for Warmth and Airflow
Red light therapy panels are not intended to heat the body like a sauna, but high-output LEDs, cooling systems, and power supplies can make a small room feel warm during repeated sessions. Client comfort may decline even when the panel is operating normally.
Ventilation can reduce discomfort and help prevent equipment overheating. Keep the panel’s air intake and exhaust areas unobstructed, and follow the required clearance from walls and furniture. Do not place curtains, towels, acoustic panels, or decorative materials against the device.
A quiet fan, open air vent, or partially open door between appointments may provide enough circulation for a compact room. Direct airflow beside the client rather than at bare skin, which can feel chilly during a 10- to 20-minute session. If the panel repeatedly becomes unusually hot, shuts down, flickers, or produces a burning odor, discontinue use and follow the manufacturer’s troubleshooting or service instructions.
Adjust Comfort Without Changing Exposure
Comfort adjustments can unintentionally change treatment exposure. Reclining a chair, adding a thick cushion, or shifting the panel angle affects both distance and coverage.
Arrange comfort items before measuring the final treatment position. Use the same chair, cushion, and foot support for each standard protocol. If a taller or shorter client needs an adjustment, change the panel height when possible instead of asking the client to lean forward or maintain an uncomfortable posture.
A timer is essential in a professional setting. Red light therapy follows a dose-response pattern, meaning insufficient exposure may be ineffective, while excessive exposure may reduce benefits or increase irritation. Longer sessions and shorter distances are not automatically better.
Many panel routines use sessions of approximately 10 to 20 minutes, but treatment time must match the specific device, distance, and intended area. If a client reports excessive warmth, lingering redness, eye discomfort, a headache, or skin irritation, stop the session, reassess the setup, and follow the manufacturer’s safety instructions.
Keep the Treatment Zone Clean and Uncluttered
Maintain enough access to clean the panel face, stand, chair, goggles, control surfaces, and nearby floor. A panel squeezed tightly between furniture may collect dust around its vents and become difficult to inspect.
When device instructions call for direct exposure, treatment should generally be delivered to clean, bare skin. Clothing, sunscreen, makeup, oils, and heavy creams may block or scatter light. Give clients clear preparation instructions, privacy to expose the intended area, and a clean place to store clothing and personal belongings.
Decor can make the room feel less clinical, but each item should serve a purpose. A small shelf, wall hook, soft indirect lamp, and one calming visual feature are often more useful than plants or furniture that narrow the walkway. Do not place water, fragrance diffusers, or drink containers on electrical equipment.
Verify the Setup Before the First Client
Run the panel through a complete timed session before offering treatment. Confirm that the mount remains secure, the stand does not drift, the timer shuts off correctly, the controls remain accessible, and the room temperature stays comfortable.
Check the light pattern from the client’s actual position rather than judging it from the doorway. Sit or stand where the client will be, wear the intended eye protection, and assess glare, fan noise, warmth, posture, and accessibility. This practical test can reveal issues that measurements miss, such as a control display that is difficult to read or a chair that encourages the client to lean too close.
Medical conditions and medications may affect whether treatment is appropriate. People with eye disease, a history of skin cancer, or medications that increase light sensitivity should seek guidance from a qualified medical professional before treatment. Red light therapy is a wellness and recovery tool, not a substitute for diagnosis or medical care.
A Consistent Small-Room Setup
The best small treatment room is not the one with the most equipment. It is one where the panel remains stable, the correct treatment distance is easy to reproduce, the client can relax without maintaining an awkward position, and both the client and staff can move without encountering cords or stand legs.
Begin with one primary posture, center the panel on the target area, mark the correct distance, provide appropriate eye protection, and test the entire client experience before opening the room. Consistent positioning and calm, comfortable sessions are more valuable than forcing maximum panel coverage into a space that cannot support it safely.


 Small
Small

 Moderate

 Moderate

 Moderate

 Full
Full

