
Treat the feature wall as a no-beam zone. Place the panel and your standing or seated position so the light cone faces into an open recovery area rather than toward the wall. Before mounting anything permanently, run a short test with the panel, your intended body position, and nearby furniture in place; then adjust the layout until the wall remains visually clear.
This approach fits a broader home-wellness design direction: dedicated recovery areas are increasingly being considered as part of the room, not equipment that disappears after use. Design-led wellness spaces may include art, decorative wallpaper, murals, or textured surfaces worth keeping in view, as noted in this perspective on wellness-focused home design.
Start with the Light Path

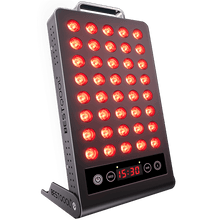
A panel's beam angle describes the width of its emitted cone of light. A narrower beam concentrates light in a smaller area, while a wider beam spreads light across more area. Neither is automatically better for a feature-wall setup; what matters is where that cone lands in your particular room.
Sketch five elements before you move the device:
- Panel location --- where the device will sit or mount.
- User position --- where you will stand, sit, or lie during use.
- Feature wall --- the wall, artwork, or finish you want to preserve.
- Obstructions --- plants, chairs, shelving, mirrors, or décor between the panel and wall.
- Cable route --- the path that keeps cords from crossing the usable floor area or distracting from the room.
The visible red glow is what you can evaluate on the wall during this test. Near-infrared output is not visible, so do not use the wall's appearance as a way to judge it.
Choose a Layout That Sends Light Away From the Wall

The simplest principle is to avoid putting your body or other tall objects directly between the panel and the feature wall. That arrangement creates the most obvious opportunity for a silhouette to appear on the wall.
| Room Arrangement | What It Can Do Visually | What to Test |
|---|---|---|
| Feature wall behind the panel | The panel can face away from the wall and into the open room. | Check whether the panel itself feels too visually prominent when the room is not in use. |
| Feature wall beside the panel | The wall may sit outside the main light cone rather than directly behind you. | Look for spill reaching the wall's edge and shadows from nearby plants or furniture. |
| Panel aimed parallel to the feature wall | A perpendicular room layout can keep the beam moving alongside the wall rather than into it. | Confirm that your intended user position still works within the model's approved setup guidance. |
| Feature wall behind the user | Your body may interrupt the light path between the panel and wall. | This is the layout most likely to create a visible body shadow, so test it before committing. |
A panel positioned between the feature wall and the user, aimed into the room, is often the cleanest starting concept. By contrast, if the user stands between the panel and the wall, the wall becomes the backdrop for the user's shadow.
Move the Objects That Interrupt the Beam
The panel is not the only object shaping the room's appearance. A tall plant, freestanding mirror, bench, lamp, or clothes rack can create a distracting outline even when your own position is well planned.
During a test session, look at the feature wall from the room's normal entry point and from the treatment position. Then make one adjustment at a time:
- Move tall décor out of the direct path between the panel and wall.
- Shift a chair, bench, or stand to the side of the treatment zone rather than behind it.
- Raise or lower the panel only if your model's instructions allow that orientation and mounting method.
- Recheck the wall after each change, because a height adjustment can change where the light cone and furniture shadows fall.
- Keep the treatment area open enough that the panel can face the user rather than being angled toward the décor.
This is especially useful in a bedroom corner or compact home gym, where the same few feet may need to function as a recovery area, a circulation path, and a visually calm part of the room. For tighter layouts, this guide to red light therapy panel setup in a small room can help you think through the available floor space.
Test the Setup Before You Mount It

Permanent mounting can make a room feel more intentional, but it should be the last step---not the first. Set up the panel temporarily using only the positioning method approved for your specific model, then assess the room with the device on.
A Simple Wall-Clear Test
- Mark your intended user position with tape or a small floor marker.
- Place the panel in its proposed location.
- Turn on the device according to its instructions.
- Stand or sit in the marked position.
- Look for visible red spill, glare, and shadows across the feature wall.
- Check what happens when a plant, chair, or other movable object is returned to the area.
- Shift the panel or user position slightly, then repeat until the wall looks intentional from the room's main viewpoint.
Do not choose a treatment distance, mounting height, or installation method solely to improve the décor. Follow the exact instructions for your BestQool model first, including its approved operating distance, mounting compatibility, ventilation, electrical setup, and eye-use guidance.
Keep the Recovery Corner Calm When It is Not in Use
A shadow-free wall matters during a session, but visual clutter can also undermine the room between sessions. Aim for a setup that allows the feature wall to remain a feature rather than becoming a backdrop for equipment.
Consider whether the panel can sit beside a storage piece, whether its stand aligns with an existing vertical element in the room, and whether the cable can follow a discreet route without crossing the treatment area. The goal is not to hide every functional element. It is to make the panel's position feel deliberate while leaving the decorative wall visually legible.
Before You Mount
- [ ] Confirm the approved setup, orientation, and mounting guidance for your exact model.
- [ ] Mark the intended user position before selecting a final panel location.
- [ ] Test the visible red beam with the feature wall in view.
- [ ] Relocate plants, furniture, and other objects that cast noticeable shadows.
- [ ] Check the room from its usual doorway and seating positions for glare or visual clutter.
- [ ] Plan a stable, unobtrusive cable route.
- [ ] Finalize the recovery corner only after the wall and treatment area both work as intended.
For model-specific setup details, review the applicable BestQool documentation before making a permanent installation decision.


 Small
Small

 Moderate

 Moderate

 Moderate

 Full
Full

